
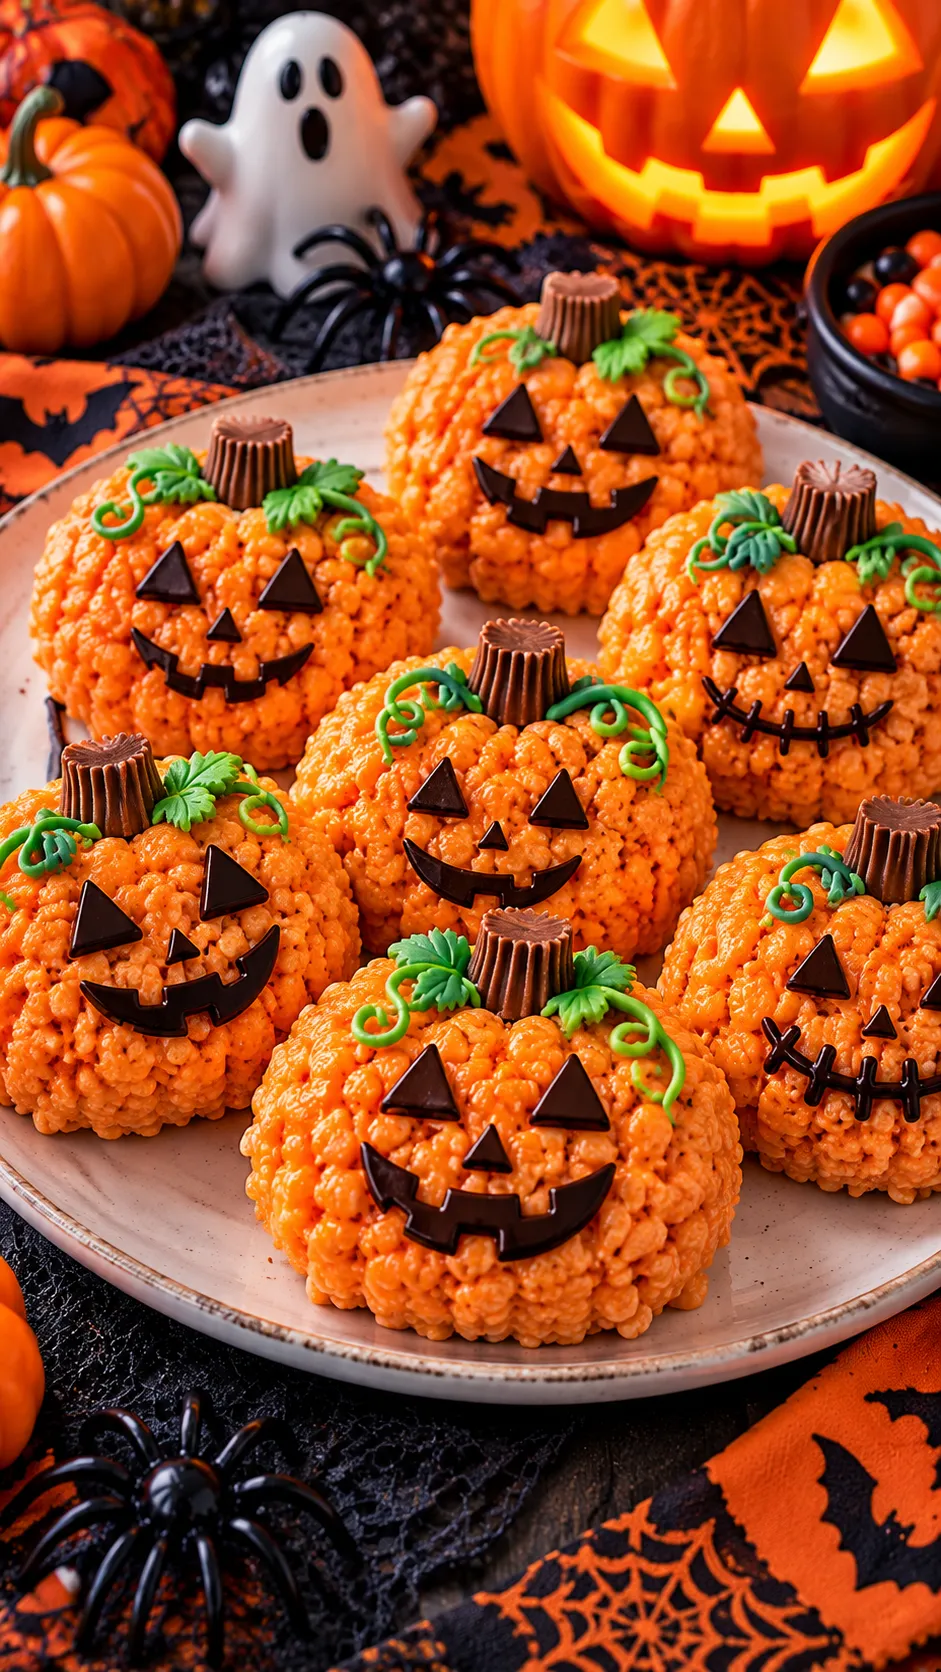
Halloween desserts should be cute, colorful, and ridiculously easy to make. And if they happen to taste like buttery marshmallow heaven, even better! These Cute Halloween Pumpkin Rice Krispie Treats turn a classic no-bake snack into adorable little pumpkins that look perfect on a Halloween dessert table.
Imagine crispy rice cereal mixed with gooey marshmallows, a cheerful orange color, and tiny green stems that bring each pumpkin to life. They’re sweet, crunchy, chewy, and so much fun to decorate. Best of all, you don’t need to turn on the oven or spend your entire afternoon creating complicated Halloween treats.
Whether you’re planning a spooky party, preparing Halloween goodies for school, or simply craving something festive, these pumpkin Rice Krispie treats deserve a place on your dessert menu. Kids can help shape and decorate them, and adults can enjoy sneaking one before the party starts. No judgment here!
Ready to make a batch of pumpkin-shaped happiness? Grab your marshmallows and cereal, because Halloween just got a whole lot sweeter.
Why This Recipe Is Awesome?
Some Halloween desserts look amazing but require the patience of a saint and the decorating skills of a professional pastry chef. These pumpkin Rice Krispie treats? Thankfully, they’re much more relaxed.
Here’s why you’ll love making them.
- No oven required: Melt, mix, shape, and decorate. Your oven can enjoy the day off.
- Simple ingredients: You only need a handful of easy-to-find ingredients to make these festive treats.
- Perfect for Halloween parties: Their bright orange color makes them stand out on dessert tables.
- Fun for kids: Little helpers can shape the pumpkins and add their own decorations with adult supervision.
- Easy to customize: Change the colors, add chocolate details, or create silly pumpkin faces.
- A delicious texture: Crispy cereal meets soft marshmallow goodness in every bite.
I especially love this recipe because it transforms an everyday snack into something that feels special. You don’t need fancy baking equipment or complicated techniques. A little melted marshmallow and a few creative touches do most of the work.
Another bonus? You can prepare these treats ahead of your Halloween gathering. That means less last-minute kitchen chaos and more time to enjoy the festivities.
And honestly, who can resist a tiny edible pumpkin?
Ingredients You’ll Need
This recipe makes approximately 12 pumpkin Rice Krispie treats, depending on the size of your pumpkins.
Ingredients
- 6 cups crispy rice cereal: The crunchy foundation of every good Rice Krispie treat.
- 10 ounces mini marshmallows: These melt quickly and help bind everything together.
- 3 tablespoons unsalted butter: Adds richness and keeps the marshmallow mixture deliciously smooth.
- Orange gel food coloring: Creates that classic pumpkin-orange appearance. Gel coloring usually gives a stronger color without adding much liquid.
- 1 teaspoon vanilla extract: Adds a lovely flavor that balances the sweetness.
- 12 small pretzel sticks: Use these as simple pumpkin stems.
- Green candy melts or green frosting: Optional, for decorating the stems and adding little leafy details.
- Cooking spray or a little butter: Helps prevent sticking when you shape the pumpkins.
Optional Decorations
Want to give your pumpkins extra personality? Try these additions:
- Black decorating icing for spooky faces.
- Mini chocolate chips for eyes.
- Melted chocolate for smiles and zigzag mouths.
- Green fondant for tiny leaves.
- Halloween sprinkles for a colorful finish.
My tip: Keep your decorations simple if you’re making a large batch. A few chocolate eyes and a pretzel stem can make each pumpkin adorable without turning your kitchen into a full-time craft studio.
Step-by-Step Instructions
Step 1: Prepare Your Workspace
Line a baking sheet or large tray with parchment paper. Lightly grease your hands and a large mixing bowl with butter or cooking spray.
Set out your cereal, marshmallows, food coloring, and decorations before you start melting anything. Marshmallow mixtures can become sticky quickly, so having everything ready makes the process much easier.
Step 2: Melt the Butter
Place the butter in a large saucepan over low heat. Let it melt slowly, stirring occasionally.
Avoid high heat because butter can brown and the marshmallow mixture can become harder and chewier than you want. Low and slow works beautifully here.
Step 3: Add the Marshmallows
Add the mini marshmallows to the melted butter. Stir continuously until they melt into a smooth, glossy mixture.
Keep the heat low and remove the pan from the stove as soon as the marshmallows melt. Overheating marshmallows can make your finished treats tough, and nobody wants to wrestle with a dessert.
Step 4: Add the Vanilla and Orange Color
Stir the vanilla extract into the melted marshmallows.
Add a few drops of orange gel food coloring and mix thoroughly. Keep adding a little at a time until you reach your preferred pumpkin shade.
Want a brighter orange? Add another tiny amount. Prefer a softer, pastel pumpkin color? Stop earlier.
Remember that the mixture may look slightly different once you combine it with the cereal, so aim for a rich orange shade before moving to the next step.
Step 5: Mix in the Rice Cereal
Add the crispy rice cereal to the marshmallow mixture.
Use a sturdy spatula to fold everything together until the cereal gets an even coating. Work gently but quickly so the mixture stays warm enough to shape.
If you notice a few uncovered cereal pieces, keep folding until the marshmallow mixture distributes evenly. You want every bite to hold together without drowning the cereal in marshmallow.
Step 6: Let the Mixture Cool Slightly
Allow the mixture to cool for a minute or two, just until you can handle it safely.
Don’t wait too long, though. Once the marshmallow mixture cools completely, shaping the pumpkins becomes much more difficult.
Lightly grease your hands before handling the mixture. This small step saves you from wearing half the dessert on your fingers.
Important: The mixture can retain heat, so adults should handle it until it reaches a safe temperature for children to touch.
Step 7: Shape the Pumpkin Treats
Scoop a portion of the mixture into your hands and gently roll it into a ball.
Press the sides lightly to create a pumpkin shape. You can make the top slightly flatter and use your fingers to create shallow grooves down the sides.
Don’t squeeze too hard. Firm pressure can crush the cereal and create dense treats instead of light, crispy ones.
Place each pumpkin on the prepared parchment-lined tray and repeat with the remaining mixture.
If the mixture begins sticking to your hands, grease them lightly again.
Step 8: Add the Pumpkin Stems
Insert a short pretzel stick into the top of each pumpkin to create a simple stem.
Push it in gently so you don’t flatten the pumpkin. If you want a more decorative look, add a small green candy leaf beside the pretzel stem.
You can also use a small piece of green fondant or a dab of green frosting to create a leafy finish.
Step 9: Decorate Your Pumpkins
Now comes the fun part!
Use black decorating icing or melted chocolate to create eyes, noses, and smiles. Make some pumpkins cheerful, some spooky, and others downright silly.
You can also leave the pumpkins plain for a clean, classic look. If you’re preparing treats for a Halloween party, consider making a mixture of decorated and undecorated pumpkins for variety.
Let the chocolate or icing set before moving the treats.
Step 10: Let Them Set and Serve
Allow your pumpkin Rice Krispie treats to rest on the tray until they hold their shape and the decorations set.
Arrange them on a Halloween platter, dessert stand, or festive serving tray. Add a few candy corn pieces or Halloween sprinkles around the edges if you want a more colorful display.
Serve them at room temperature for the best balance of crispy cereal and chewy marshmallow.
Congratulations! You’ve officially turned a classic snack into a pumpkin patch that tastes delicious.
Common Mistakes to Avoid
Even an easy no-bake recipe has a few tricks worth knowing. Avoid these mistakes, and your pumpkin treats will turn out much better.
1. Heating the Marshmallows Too Quickly
High heat can make marshmallows tough and sticky.
The fix: Melt the butter and marshmallows over low heat. Stir constantly and remove the pan from the stove as soon as the mixture becomes smooth.
2. Pressing the Mixture Too Firmly
Squashing the cereal mixture too hard creates dense, heavy treats.
The fix: Shape the pumpkins gently. Use enough pressure to hold everything together without crushing the cereal.
3. Adding Too Much Food Coloring
Too much liquid food coloring can affect the mixture’s texture.
The fix: Choose gel food coloring and add it gradually. You can always deepen the orange shade, but removing excess color isn’t exactly an option.
4. Waiting Too Long to Shape the Pumpkins
Marshmallow cereal mixtures become harder to handle as they cool.
The fix: Shape the pumpkins while the mixture remains warm enough to mold comfortably. Grease your hands to make the job easier.
5. Skipping the Grease
Sticky marshmallow mixture can cling to your hands, utensils, and bowls like it pays rent.
The fix: Lightly grease your hands, spatula, and mixing bowl before you start shaping.
6. Adding Decorations Too Early
Warm treats can cause chocolate decorations and frosting to melt or slide.
The fix: Let the pumpkins cool slightly before adding delicate decorations. Allow chocolate details to set before stacking or packaging the treats.
Alternatives & Substitutions
One of the best things about these Halloween pumpkin Rice Krispie treats is how easily you can adapt them.
Use Different Crispy Cereals
Classic crispy rice cereal gives you the familiar Rice Krispie texture, but you can experiment with similar puffed rice cereals.
Check the cereal’s texture before using it. Heavier or sweeter varieties may produce a different result, so start with the same quantity and adjust only if necessary.
Make Chocolate Pumpkin Treats
If you’re a chocolate lover, add a small amount of melted chocolate to the finished treats as a decoration.
You can also drizzle melted white chocolate over the pumpkins to create a ghostly effect. However, adding too much liquid chocolate directly to the marshmallow mixture may change its texture, so keep the extra chocolate for decorating.
Try Different Pumpkin Colors
Orange is classic, but nobody says every pumpkin needs to look identical.
Try pale orange pumpkins, deep orange pumpkins, or a few green treats for a playful Halloween display. Use gel food coloring and add it gradually to control the shade.
Use Candy Stems Instead of Pretzels
Pretzel sticks make convenient stems and add a salty crunch. If you don’t have any, use small pieces of green candy or fondant.
You can also pipe green frosting onto the top of each pumpkin. Add frosting shortly before serving for the neatest appearance.
Make Mini Pumpkin Treats
Want smaller treats for a classroom party or dessert buffet? Shape the mixture into bite-sized pumpkins instead of full-sized ones.
Use shorter pretzel pieces for the stems, and keep the decorations simple. Mini pumpkins look adorable arranged together on a large serving tray.
Create Jack-O’-Lantern Faces
Turn your pumpkins into classic Halloween characters with chocolate or black icing.
Make triangle eyes, crooked smiles, or tiny vampire teeth. You can even give each pumpkin a different expression, because apparently pumpkins deserve personalities too.
FAQs
1. Can I make pumpkin Rice Krispie treats ahead of time?
Yes! You can make these treats a day or two before your Halloween party. Let them set completely, then store them in an airtight container at room temperature in a cool, dry place.
Avoid refrigerating them unless necessary because the cold can make the cereal treats firmer and less pleasant to bite.
2. How do I keep Rice Krispie treats soft and chewy?
Use fresh marshmallows, melt them over low heat, and avoid pressing the mixture too firmly when shaping the pumpkins.
Store the finished treats in an airtight container to prevent them from drying out. Fresh marshmallows and gentle handling make a noticeable difference.
3. Can I use regular marshmallows instead of mini marshmallows?
Absolutely. Regular marshmallows work well, but they may take a little longer to melt.
Keep the heat low and stir continuously. Use the same weight of marshmallows rather than relying on the number of individual marshmallows.
4. Can I make these Halloween treats without food coloring?
Of course! The treats will have their natural pale marshmallow color, but they’ll still taste delicious.
You can decorate them with orange icing or drizzle them with orange-colored chocolate if you want to keep the pumpkin theme.
5. How should I store pumpkin Rice Krispie treats?
Place them in an airtight container at room temperature, away from heat and moisture. For the best texture, enjoy them within about 2–3 days.
If you stack the treats, separate the layers with parchment paper to protect the decorations.
6. Can I freeze pumpkin Rice Krispie treats?
You can freeze them, although freezing may affect their texture and decorations. Wrap each treat individually, place them in a freezer-safe container, and thaw them at room temperature while still wrapped to help prevent condensation from collecting directly on the treats.
For the freshest texture and prettiest decorations, I prefer making them a day or two ahead rather than freezing them.
7. Are these pumpkin Rice Krispie treats gluten-free?
They can be, but you need to check every ingredient. Choose crispy rice cereal, marshmallows, pretzels, and decorations labeled gluten-free when necessary, and check for cross-contact warnings if you’re preparing them for someone with celiac disease or a serious gluten sensitivity.
Final Thoughts
These Cute Halloween Pumpkin Rice Krispie Treats prove that festive desserts don’t need complicated recipes or hours of decorating.
With crispy cereal, gooey marshmallows, cheerful orange coloring, and simple pumpkin decorations, you can make a Halloween snack that looks adorable and tastes even better. They’re perfect for parties, family celebrations, school events, or a cozy spooky movie night at home.
The secret is simple: melt the marshmallows gently, shape the mixture while it’s warm, and let your creativity handle the decorating.
Don’t worry if your pumpkins look a little lopsided. Real pumpkins aren’t perfectly identical, and neither should your homemade treats be.
Make a batch, arrang e them on your favorite Halloween platter, and watch everyone reach for one. Just remember to save yourself a pumpkin before they disappear.
Happy Halloween, and may your treats stay crispy, your marshmallows stay gooey, and your kitchen stay only slightly sticky.