
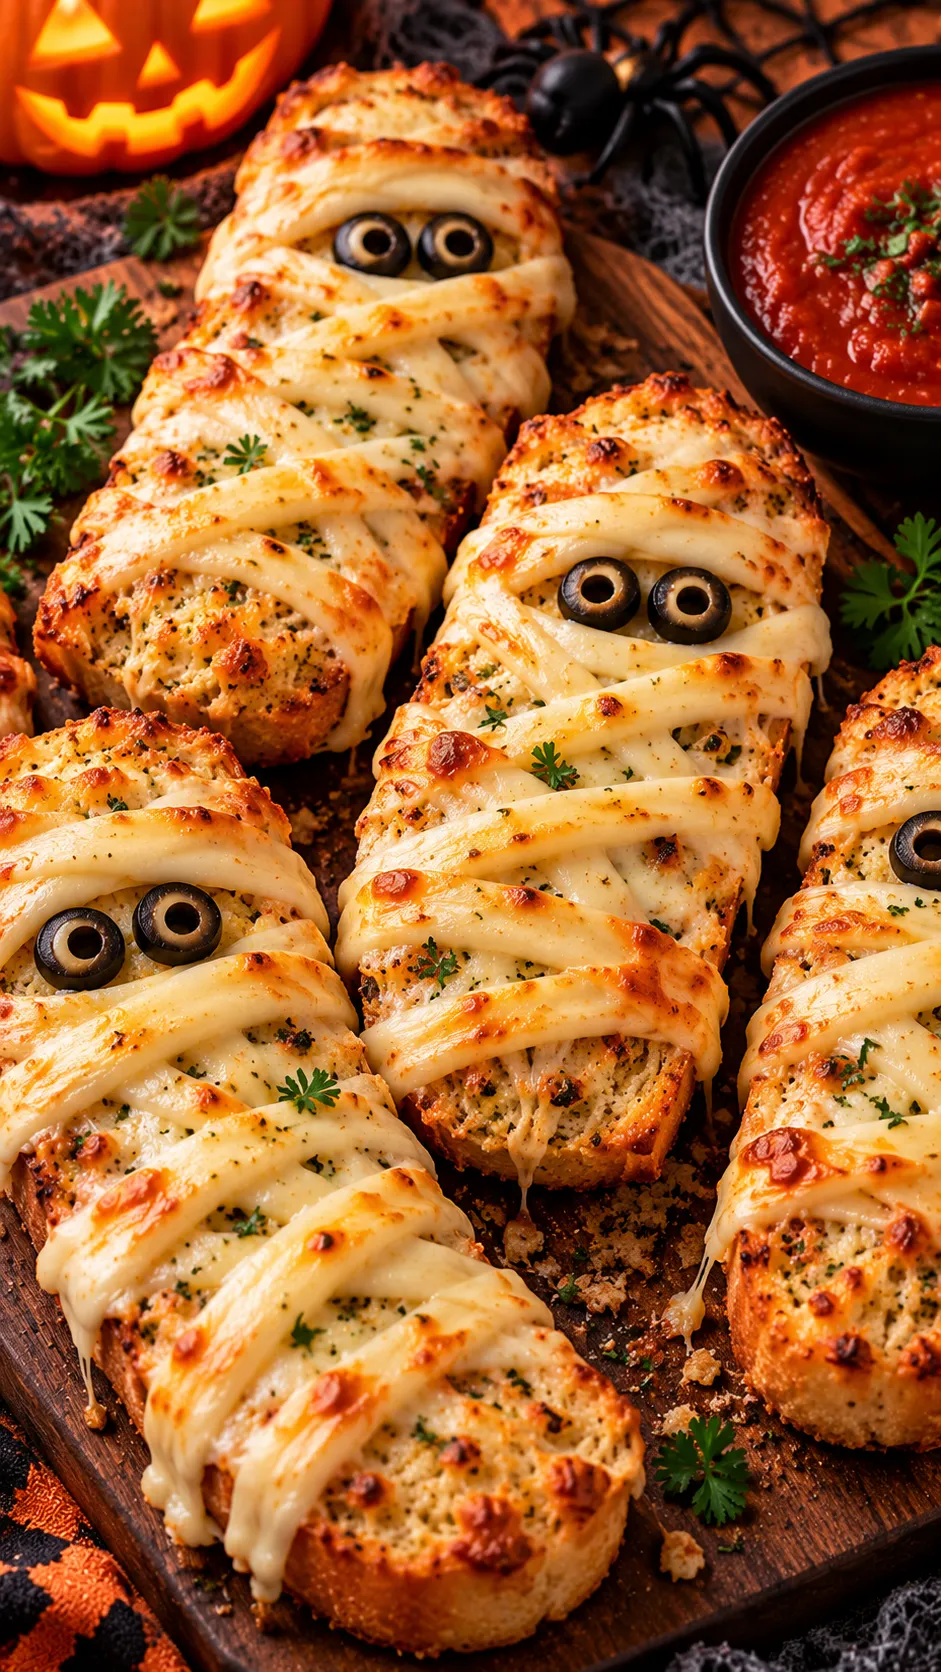
Halloween food should be fun, a little spooky, and ridiculously delicious. And honestly, what could be better than warm, buttery garlic bread dressed up like a tiny mummy? This Easy Halloween Mummy Garlic Bread With Mozzarella brings crispy bread, gooey cheese, and adorable olive eyes together for a Halloween snack that looks impressive without making you work like a kitchen witch.
Whether you’re planning a Halloween party, preparing spooky snacks for the kids, or just looking for an excuse to eat more cheesy garlic bread, this recipe deserves a spot on your menu. It uses simple ingredients, takes only a few minutes to prepare, and turns an everyday favorite into something festive.
The best part? You don’t need professional decorating skills. If you can spread garlic butter and arrange a few strips of cheese, you’re already halfway there. So grab your bread, mozzarella, and garlic butter, because these little mummies are ready to steal the show!
Why This Recipe Is Awesome?
Let’s be honest: Halloween treats can get complicated. Between elaborate cupcakes, complicated cookies, and snacks that require approximately seventeen decorating tools, sometimes you just want something easy.
That’s where this Halloween mummy garlic bread comes to the rescue.
Here’s why you’ll love it:
- Quick and easy: You can prepare these spooky snacks without spending hours in the kitchen.
- Cheesy goodness: Mozzarella melts into delicious, stretchy ribbons that make perfect mummy bandages.
- Garlicky and buttery: Because plain bread is lovely, but garlic bread has main-character energy.
- Perfect for parties: Serve these mummies at Halloween gatherings, school parties, movie nights, or family dinners.
- Kid-friendly fun: Let children help arrange the cheese and olive eyes, with an adult handling the hot oven.
- Easy to customize: Add herbs, extra cheese, or your favorite seasonings to make the recipe your own.
I especially love how the mozzarella creates that messy, wrapped-up mummy appearance. You don’t need every cheese strip to look perfect. In fact, the slightly uneven ones make the bread look even more like a little mummy escaped from a Halloween movie.
And unlike some decorative Halloween foods, these treats taste just as good as they look.
Ingredients You’ll Need
This recipe keeps things simple with everyday ingredients. You can use homemade garlic butter or grab your favorite store-bought version when life gets busy.
Ingredients for 8 mummy garlic bread pieces:
- 1 French baguette: Choose a medium-sized baguette and slice it into 8 pieces, or use 4 small rolls cut in half.
- 4 tablespoons unsalted butter: Soften it before mixing so you can spread it easily.
- 3 garlic cloves, minced: Fresh garlic gives the bread a delicious, savory flavor.
- 1 tablespoon chopped fresh parsley: This adds color and a fresh herbal taste.
- 1 cup shredded mozzarella cheese: Use low-moisture mozzarella for a lovely melt.
- 16 small black olive pieces: These create the mummy eyes. Cut pitted black olives into small rounds or pieces.
- 2 tablespoons grated Parmesan cheese: Optional, but it adds a salty, cheesy finish.
- ⅛ teaspoon salt: Adjust according to the saltiness of your butter and cheese.
- ¼ teaspoon Italian seasoning: Optional, for extra flavor.
- Cooking spray or a little olive oil: Use this to lightly grease your baking tray if needed.
Quick ingredient tip: Shredded mozzarella works well, but you can also slice a block of mozzarella into thin strips. The strips make it easier to create that classic mummy-bandage effect.
Step-by-Step Instructions
Ready to bring your edible mummies to life? Don’t worry. These steps are beginner-friendly, and the oven does most of the work.
Step 1: Preheat the Oven
Preheat your oven to 375°F (190°C). Line a baking tray with parchment paper or lightly grease it.
Give the oven time to reach the correct temperature. Starting with a properly heated oven helps the bread toast evenly and the cheese melt beautifully.
Step 2: Slice the Bread
Slice your baguette into 8 pieces, about ½ to ¾ inch thick.
Arrange the slices on your prepared baking tray with a little space between each piece. You want enough room to spread the garlic butter without turning your tray into a bread traffic jam.
If you’re using small rolls, cut them in half horizontally.
Step 3: Make the Garlic Butter
Add the softened butter, minced garlic, chopped parsley, salt, and Italian seasoning to a small bowl.
Mix everything until the garlic and herbs distribute evenly throughout the butter. Give it a quick taste and adjust the seasoning if needed.
Pro tip: Let the garlic butter sit for a few minutes before spreading it. This gives the garlic flavor time to mingle with the butter.
Step 4: Spread the Garlic Butter
Spread a thin, even layer of garlic butter over each bread slice.
Make sure you cover the surface, but don’t pile on too much butter. Excess butter can make the bread greasy instead of deliciously crisp.
If you love extra garlic flavor, add a little more minced garlic. Just remember that raw garlic has a strong bite, so a little goes a long way.
Step 5: Add a Little Cheese
Sprinkle a small amount of shredded mozzarella over each slice, using just enough to create a light cheesy base.
You don’t need to cover every inch with cheese yet. Save most of the mozzarella for the mummy bandages.
If you’re using Parmesan, sprinkle a little over the top for extra savory flavor.
Step 6: Bake the Bread
Place the tray in the preheated oven and bake for approximately 5–7 minutes, or until the bread begins to toast and the cheese starts melting.
Keep an eye on the bread because thin slices can brown quickly. You want lightly golden edges, not charcoal-colored mummies.
Remember, you’ll return the bread to the oven after adding the decorative cheese strips.
Step 7: Create the Mummy Bandages
Remove the tray carefully from the oven.
Arrange thin strips of mozzarella across each slice in slightly overlapping, diagonal or horizontal lines. Leave a small gap near the top of each piece for the eyes.
Don’t worry about making the strips perfectly straight. Mummies have been wrapped for centuries, and apparently nobody has invented a ruler for their bandages.
For the best effect, use thin cheese strips rather than piling shredded cheese across the entire surface.
Step 8: Add the Olive Eyes
Place two small pieces of black olive near the top of each bread slice.
Press them gently into the cheese so they stay in place. Try to leave a little space around the eyes so they remain visible after baking.
Want a sillier look? Place the eyes at slightly different heights. Your mummies will look surprised, sleepy, or mildly concerned about being turned into snacks.
Step 9: Finish Baking
Return the tray to the oven for another 3–5 minutes, or until the mozzarella melts and the bread edges turn golden.
If you want lightly browned cheese, switch to the broiler for the final 30–60 seconds. Stay beside the oven during this step because cheese can brown very quickly under direct heat.
Remove the tray when the cheese looks melted and the bread feels crisp around the edges.
Step 10: Serve Your Spooky Garlic Bread
Let the mummy garlic bread cool for about 2 minutes before serving.
Arrange the pieces on a Halloween platter and add a few parsley leaves or a small bowl of marinara sauce for dipping. You can even surround the bread with themed decorations to create a festive party display.
Serve the bread warm while the mozzarella still stretches beautifully. Trust me, nobody will complain about a snack that combines buttery garlic bread with gooey cheese.
Common Mistakes to Avoid
Even a simple recipe can go wrong if you rush it. Fortunately, these little mistakes are easy to avoid.
Using Too Much Garlic Butter
Garlic butter tastes amazing, but soaking the bread can leave it greasy and soft.
The fix: Spread a thin, even layer across each slice. You want buttery flavor without a puddle of melted butter on your tray.
Adding Thick Cheese Strips
Thick mozzarella strips may not melt evenly before the bread gets too brown.
The fix: Cut the cheese into thin strips. They’ll melt more quickly and create a more recognizable mummy appearance.
Covering the Eyes With Cheese
You’ve made adorable little mummies, and now their eyes have disappeared under a blanket of mozzarella. Tragic.
The fix: Leave a small opening near the top of each slice before arranging the cheese. Add the olive pieces where you can clearly see them.
Baking the Bread for Too Long
Overbaking can turn the bread hard and the cheese rubbery or overly browned.
The fix: Watch the bread during both baking stages. Oven temperatures vary, so use the visual cues rather than relying only on the timer.
Using Fresh Mozzarella Without Adjusting the Method
Fresh mozzarella contains more moisture than low-moisture mozzarella. That extra moisture can make the bread soggy.
The fix: Choose low-moisture mozzarella for easier decorating and a less watery result. If you prefer fresh mozzarella, pat it dry and cut it into thin pieces.
Preparing the Bread Too Far Ahead
If you assemble the bread hours before baking, the butter can soak into the slices and soften them.
The fix: For the crispiest results, assemble and bake the mummy garlic bread shortly before serving. You can prepare the garlic butter and cheese strips in advance.
Alternatives & Substitutions
One of my favorite things about this recipe is how easy it is to adapt. You can change the bread, cheese, or seasoning without losing the spooky Halloween look.
Use Different Types of Bread
A French baguette creates small, crispy portions that work beautifully for party platters.
However, you can also use:
- Italian bread: Choose it for a softer center and a slightly chewy crust.
- Ciabatta: Its sturdy texture makes a good base for garlic butter and cheese.
- Small dinner rolls: Cut them in half for rounder mummy faces.
- Texas toast: Use thick slices when you want larger, more substantial portions.
Keep the thickness reasonably consistent so the bread toasts evenly.
Try Different Cheeses
Mozzarella gives you the classic stretchy, mummy-bandage look, but you have options.
- Provolone: Offers a mild flavor and melts nicely.
- Monterey Jack: Creates a creamy, mild cheese topping.
- Cheddar: Adds a stronger flavor, although it creates a more yellow-orange mummy.
- Mozzarella and Parmesan: My favorite combination when I want a little extra savory flavor.
For the most recognizable mummy effect, stick with mozzarella or combine it with a small amount of another melting cheese.
Make It Extra Garlicky
If you’re a serious garlic lover, add a pinch of garlic powder to the butter mixture.
You can also sprinkle a little garlic powder over the bread before baking. Avoid adding too much fresh garlic on top because small pieces can burn and taste bitter.
Make It Spicy
Want a little heat? Add a pinch of red pepper flakes or a light sprinkle of cayenne pepper to the garlic butter.
The spicy flavor pairs nicely with the creamy mozzarella. Serve the finished bread with marinara sauce if you want an extra kick.
Swap the Olive Eyes
Black olives create a simple, recognizable mummy face, but they’re not your only option.
You can use tiny pieces of sliced black olive, small dots of thick marinara sauce, or another edible decoration that contrasts with the cheese.
For young children, cut any firm toppings into age-appropriate pieces and supervise eating.
Make It Vegetarian-Friendly
This recipe works well as a vegetarian snack when you use vegetarian-friendly cheese and check the labels on your bread and other ingredients.
If you plan to serve it to guests, ask about dietary needs and check ingredient labels rather than assuming every mozzarella or bread product suits every diet.
FAQs
1. Can I make Halloween mummy garlic bread ahead of time?
Yes! You can prepare the garlic butter, slice the bread, and cut the mozzarella strips a day ahead. Store the components separately in airtight containers in the refrigerator, then assemble and bake shortly before serving for the best texture.
2. Can I use store-bought garlic bread?
Absolutely. Why make extra work when the store has already done half the job? Use plain frozen or refrigerated garlic bread, follow its package directions for the initial bake, then add the mozzarella bandages and olive eyes. Return it to the oven until the cheese melts.
3. How do I keep the mozzarella from sliding off?
Use thin cheese strips and place them over a light layer of melted cheese. The warm cheese underneath helps the bandages stick. Avoid piling on too much butter because a greasy surface can make the toppings slide around.
4. Can I make this recipe in an air fryer?
Yes, if your air fryer has enough space for the bread pieces. Start at around 350°F (175°C) and check frequently because air fryers can cook faster than conventional ovens. Work in batches, and make sure the cheese stays in place as it melts.
5. How should I store leftover mummy garlic bread?
Let the bread cool, then place it in an airtight container and refrigerate it within 2 hours. Enjoy it within 3–4 days for the best quality. Reheat it in an oven or air fryer until hot throughout to help restore its crisp edges.
6. Can I freeze Halloween mummy garlic bread?
Yes, but freezing may slightly change the texture of the bread and cheese. For better results, freeze the assembled pieces before the final cheese-melting stage, wrapped well in a freezer-safe container. Bake from frozen, adding extra time as needed, and check that the bread heats through and the cheese melts properly.
7. What can I serve with mummy garlic bread?
Serve it with marinara sauce, tomato soup, pumpkin soup, or a Halloween snack board. It also pairs well with pasta and a simple green salad if you want to turn your spooky appetizer into part of a full meal.
Final Thoughts
These Easy Halloween Mummy Garlic Bread With Mozzarella bites prove that Halloween food doesn’t need complicated decorations or expensive ingredients to feel special.
With buttery garlic bread, melty mozzarella, and little olive eyes, you can turn an everyday snack into a spooky party favorite in just a few simple steps. The recipe works for family movie nights, Halloween parties, and those evenings when you want something fun to eat without creating a mountain of dirty dishes.
Remember to keep the cheese strips thin, leave room for the eyes, and watch the oven carefully during the final bake.
Now grab that baguette, wrap up some cheesy mummies, and get ready to hear someone say, “Wait, these are actually adorable” Just make enough, because these little guys tend to disappear faster than Halloween candy.
Happy Halloween baking.