
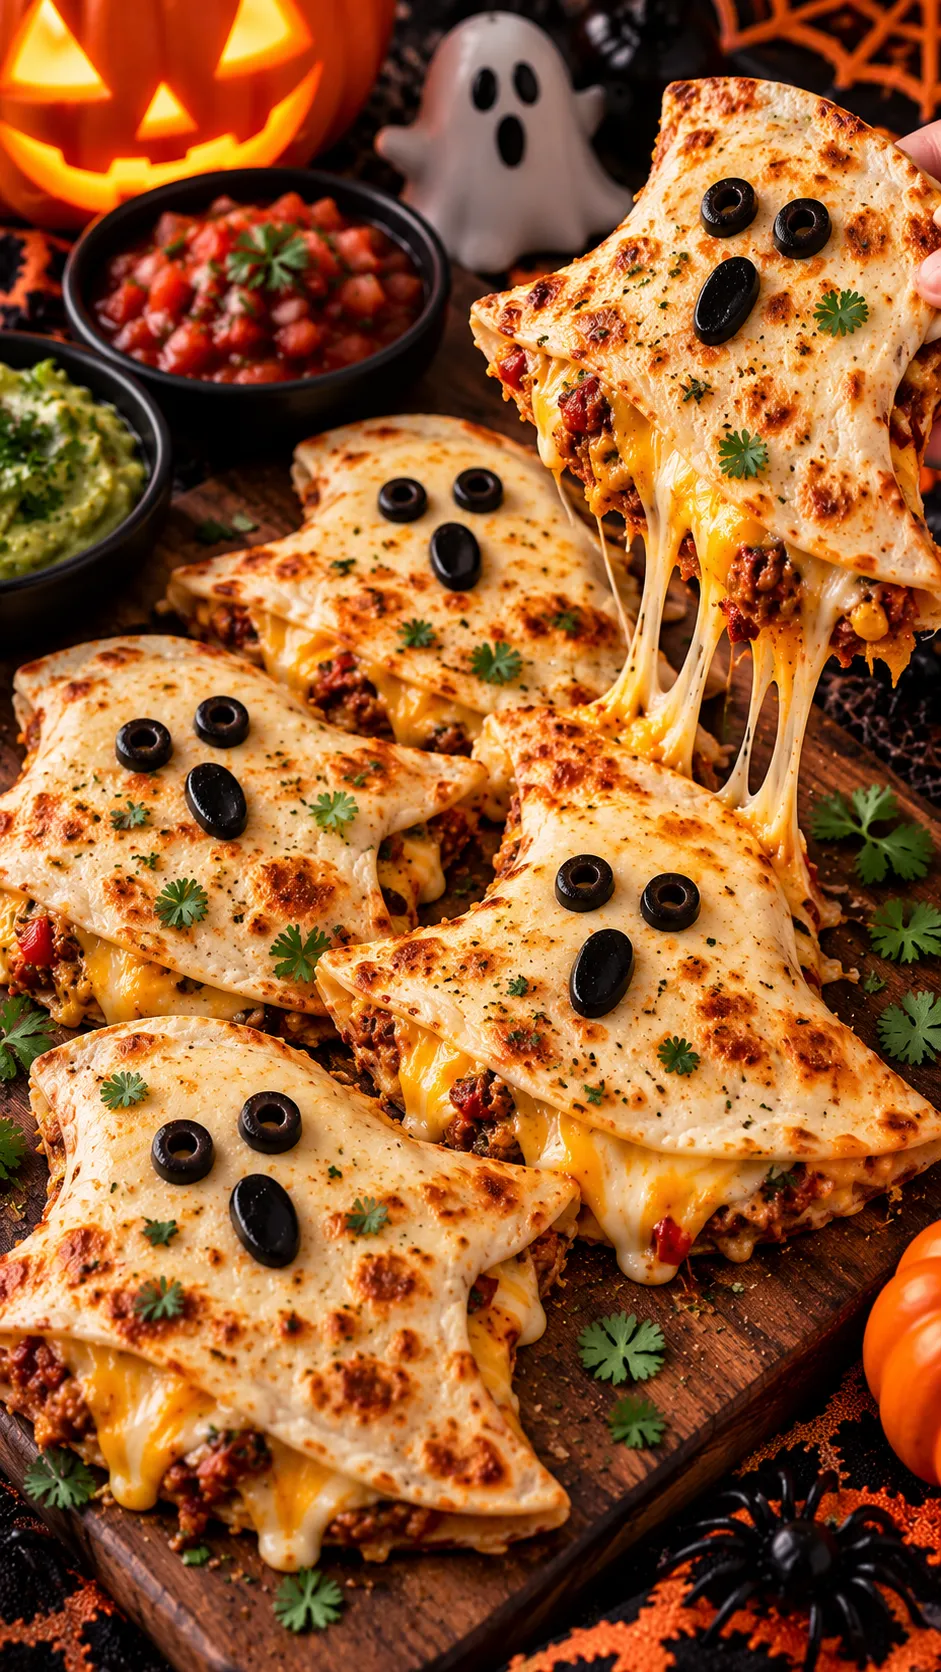
Halloween dinner just got a whole lot cuter! These Easy Halloween Ghost Quesadillas for Kids turn ordinary tortillas and melted cheese into adorable little ghosts that kids will love eating. They’re crispy on the outside, gooey in the middle, and so easy to make that you won’t need a culinary degree or a kitchen full of spooky gadgets.
Whether you’re planning a Halloween party, preparing a fun after-school snack, or trying to get your little monsters excited about dinner, these ghost quesadillas fit the bill. You only need a handful of ingredients, a few minutes of prep, and a ghost-shaped cutter or a sharp knife.
The best part? Kids can help make them! Let them cut out ghost shapes, sprinkle the cheese, and add silly faces. Just keep the hot pan away from little hands because we want spooky smiles, not Halloween boo-boos.
Ready to make a Halloween snack that disappears faster than a ghost at sunrise? Let’s get cooking!
Why This Recipe Is Awesome?
There are plenty of Halloween treats that require complicated decorating, expensive ingredients, or enough patience to qualify as a superpower. These Halloween ghost quesadillas keep things wonderfully simple.
Here’s why they deserve a spot on your Halloween menu.
- Kid-friendly ingredients: Tortillas, cheese, and a little butter create a familiar snack that most kids already enjoy.
- Quick and easy: You can prepare these quesadillas in about 20–25 minutes, depending on how many ghosts you make.
- Perfect for Halloween parties: Their cute ghost shapes make them a fun addition to a spooky snack table.
- Easy to customize: Add chicken, beans, or mild taco seasoning if your family wants something more filling.
- Budget-friendly: You don’t need specialty ingredients or elaborate decorations.
- Fun for little helpers: Children can help assemble the ghosts and decorate their faces before cooking.
IMO, the best Halloween recipes combine familiar flavors with a playful presentation. Kids don’t always need complicated food; sometimes, they just want a cheesy ghost staring back at them from their plate. Fair enough!
You can also serve these quesadillas with salsa, guacamole, sour cream, or a simple bowl of fruit. That gives everyone something to dip, munch, and enjoy while they get ready for Halloween festivities.
Ingredients You’ll Need
This recipe makes approximately 6–8 small ghost quesadillas, depending on the size of your cutter and tortillas.
- 4 medium flour tortillas: These create the ghost shapes. Choose soft tortillas that bend without cracking.
- 1 cup shredded cheddar cheese: Cheddar adds a delicious, familiar flavor and melts beautifully.
- 1 cup shredded Monterey Jack cheese: This cheese melts smoothly and makes the filling extra gooey.
- 1 tablespoon butter: Use softened butter to lightly coat the pan and help the tortillas turn golden.
- 8–12 black sesame seeds: Use these for tiny ghost eyes and mouths if you want edible decorations.
- 2 tablespoons mild salsa: Serve it on the side for dipping.
- 2 tablespoons sour cream: Another tasty dipping option for little snackers.
- Cooking spray or a little extra butter: Use this if your skillet needs additional greasing.
Optional Filling Ideas
Want to make your ghosts a little more substantial? Try one of these additions:
- Cooked shredded chicken: Adds protein and makes the quesadillas more filling.
- Mashed black beans: A simple, hearty option that pairs nicely with cheddar.
- Finely diced bell peppers: Add a little color and crunch.
- Mild taco seasoning: Sprinkle in a small amount for extra flavor.
- Cooked corn: Adds a touch of sweetness that works well with cheese.
My tip: Keep the filling simple when serving younger children. Too many ingredients can make the ghost shapes harder to handle, and nobody wants a cheese ghost that falls apart before reaching the plate.
Step-by-Step Instructions
Step 1: Prepare Your Ingredients
Start by shredding your cheeses if you haven’t already. Combine the cheddar and Monterey Jack in a small bowl, then set the mixture aside.
Place your tortillas on a clean cutting board. Make sure you have a ghost-shaped cookie cutter or a small, sharp knife ready for shaping.
If you’re using chicken, beans, or vegetables, prepare those ingredients before you start assembling the quesadillas. Cooking moves quickly once the tortillas hit the skillet, so a little organization saves you from frantic cheese-related chaos.
Step 2: Cut Out the Ghost Shapes
Use a ghost-shaped cookie cutter to cut several ghost shapes from the tortillas. If you don’t have a cutter, draw a simple ghost outline with a knife, using rounded shoulders and a wavy bottom.
Aim for shapes that are large enough to hold some cheese without breaking. You can use the leftover tortilla scraps to make little tortilla chips or mini cheese quesadillas. Waste not, snack more!
Important: If you use a knife, let an adult handle the cutting. Children can help arrange the finished tortilla shapes on the board instead.
Step 3: Add the Cheese Filling
Place half of your ghost-shaped tortillas on the cutting board. Sprinkle a small amount of the cheese mixture over each one, leaving a narrow border around the edges.
If you want to add chicken, beans, or corn, use a small amount so the filling doesn’t spill out. Add another ghost-shaped tortilla on top of each filled piece.
Press the edges gently with your fingertips. Don’t squash the ghosts flat; just help the two tortilla layers sit together.
If your tortillas are too small to create full sandwich-style ghosts, you can make single-layer ghost tortillas with cheese sprinkled on top and serve them as mini tortilla melts instead.
Step 4: Heat the Skillet
Place a nonstick skillet over medium-low heat. Add the butter and let it melt, coating the bottom of the pan lightly.
Avoid turning the heat too high. Flour tortillas can brown quickly, and cheese needs enough time to melt before the outside becomes too dark.
If you’re making several batches, keep the heat steady and wipe away any excess cheese that escapes into the pan between batches.
Step 5: Cook the Ghost Quesadillas
Carefully place two or three ghost quesadillas in the skillet, leaving enough space to flip them easily. Cook each side for about 2–3 minutes, or until the tortilla turns golden and the cheese melts.
Use a thin spatula to flip each ghost gently. If the filling starts escaping, press the edges lightly with the spatula and lower the heat a little.
Look for these signs that they’re ready:
- The tortillas have golden-brown spots.
- The cheese has melted inside.
- The quesadillas hold their shape when you lift them.
Transfer the cooked ghosts to a plate and repeat with the remaining quesadillas.
Step 6: Give Your Ghosts Their Faces
Let the quesadillas cool for a minute or two before decorating them. You can use black sesame seeds for tiny eyes and mouths, pressing them gently onto the warm tortilla.
For a different look, cut small pieces from a black olive and use them to create funny expressions. You can also leave the ghosts plain and let children add faces to their own portions with small amounts of sour cream or mild salsa.
Want a whole family of ghosts? Give some surprised expressions, some sleepy eyes, and a few silly smiles. The more personality, the better!
Safety tip: Cut toppings into age-appropriate pieces and supervise young children. Always check that the quesadillas have cooled enough before serving.
Step 7: Serve and Enjoy
Arrange the finished Halloween ghost quesadillas on a large plate or platter. Add small bowls of salsa, sour cream, and guacamole around the edges.
For a festive presentation, surround the ghosts with orange bell pepper strips, cucumber slices, or carrot sticks. You can even use a few tortilla scraps to make tiny stars or spooky shapes.
Serve the quesadillas while they’re warm and cheesy. If you’re preparing them for a party, cook them in batches so guests can enjoy them fresh from the skillet.
And don’t be surprised if your kids name every ghost before eating it. Apparently, even snacks need a social life.
Common Mistakes to Avoid
These Halloween quesadillas are easy to make, but a few small mistakes can turn your adorable ghosts into crispy little mysteries.
1. Using Too Much Cheese
Extra cheese sounds wonderful until it escapes from every side and burns in the skillet. Add just enough to create a gooey center while keeping the edges manageable.
2. Turning the Heat Too High
High heat browns tortillas before the cheese has time to melt. Use medium-low heat and give each side a couple of minutes to cook properly.
3. Cutting Shapes That Are Too Small
Tiny ghosts leave little room for filling and become difficult to flip. Make medium-sized shapes whenever possible.
4. Overfilling the Tortillas
Large pieces of chicken, thick layers of cheese, and bulky vegetables can make your ghosts fall apart. Chop optional fillings finely and use them sparingly.
5. Decorating Before the Cheese Sets
If you add sesame seeds or olive pieces while the cheese is extremely hot, the decorations may slide around. Let each quesadilla cool briefly before adding its face.
6. Forgetting About the Tortilla Scraps
Don’t toss those leftover pieces! Brush them lightly with butter, sprinkle them with seasoning, and bake them until crisp for homemade tortilla chips.
7. Making Everything Too Far Ahead
Quesadillas taste best when they’re warm and crisp. If you prepare them too early, the tortillas can soften and lose their lovely texture.
Alternatives & Substitutions
One of the best things about this recipe is how easily you can adjust it for your family.
Change the Cheese
Cheddar and Monterey Jack make a tasty combination, but you can use mozzarella, Colby Jack, or a mild Mexican cheese blend.
Mozzarella creates a stretchy filling, while cheddar delivers a stronger flavor. If you ask me, cheddar plus Monterey Jack gives you a lovely balance of flavor and meltiness.
Use Whole-Wheat Tortillas
Whole-wheat tortillas work well if you prefer their slightly nutty flavor. Check that they bend easily before cutting out the ghost shapes.
Corn tortillas can also work, but they often crack more easily. Warm them briefly before shaping, and expect a slightly different texture.
Add Chicken for Extra Protein
Mix finely shredded, fully cooked chicken with the cheese before assembling the quesadillas. Season it lightly with salt, pepper, or mild taco seasoning.
You can also add mashed beans for a vegetarian option. Keep the filling thin enough for the ghosts to stay together.
Make Them Vegetarian
Skip the chicken and add black beans, corn, or finely chopped bell peppers. These ingredients add flavor without making the recipe complicated.
If you want a little extra richness, add a small spoonful of mashed avocado after cooking rather than stuffing the quesadillas too full.
Try Different Ghost Faces
Black sesame seeds work well, but you have other options.
- Black olives: Cut tiny pieces for eyes and mouths.
- Nori seaweed: Use small pieces to create expressive faces.
- Sour cream: Add dots or little expressions with a clean food-safe squeeze bottle.
- Mild salsa: Serve it alongside the ghosts rather than using it as a wet filling.
Choose decorations that suit the ages of the children you’re serving, and supervise younger kids while they eat.
Make Them in an Air Fryer
You can cook small quesadillas in an air fryer, although the exact timing depends on your appliance and tortilla thickness.
Preheat the air fryer to 350°F (175°C). Lightly brush the quesadillas with butter or cooking spray, then cook for approximately 4–6 minutes, checking halfway through.
Keep an eye on them because thin tortillas can brown quickly. Arrange them in a single layer, and avoid stacking them.
FAQs
1. Can I Make Halloween Ghost Quesadillas Ahead of Time?
Yes! You can cut the tortilla shapes and prepare the cheese filling a few hours ahead. Store the shapes covered and the cheese in the refrigerator until you’re ready to assemble them.
For the best texture, cook the quesadillas shortly before serving. Freshly cooked tortillas stay crispier than ones that sit around for hours.
2. What Cheese Works Best for Ghost Quesadillas?
Cheddar, Monterey Jack, and mozzarella all work well. Cheddar adds a rich flavor, Monterey Jack melts smoothly, and mozzarella gives you those fun cheesy stretches.
Can’t decide? Combine cheddar and Monterey Jack. You get a flavorful filling without making things complicated.
3. Can I Make These Halloween Quesadillas Without a Ghost Cookie Cutter?
Absolutely! Use a small knife to cut simple ghost outlines from your tortillas. Create a rounded head, short sides, and a wavy bottom.
Your ghosts don’t need identical shapes. A slightly wonky ghost often looks even cuter, and nobody expects your Halloween snack to pass an architecture exam.
4. How Do I Keep Ghost Quesadillas From Falling Apart?
Use a moderate amount of cheese, avoid bulky fillings, and cook the quesadillas over medium-low heat. Flip them gently with a thin spatula after the bottom has developed a light golden crust.
Let them rest for a minute before serving so the melted cheese can settle.
5. Can I Make These Ghost Quesadillas in the Oven?
Yes. Preheat your oven to 375°F (190°C) and arrange the assembled quesadillas on a lightly greased baking sheet.
Bake for approximately 8–12 minutes, checking regularly until the tortillas turn lightly golden and the cheese melts. Cooking time may vary depending on their size and thickness.
For extra browning, you can briefly use the broiler, but watch them closely because tortillas can burn quickly.
6. What Can I Serve With Halloween Ghost Quesadillas?
Serve them with mild salsa, sour cream, guacamole, cucumber sticks, carrot sticks, or fresh fruit.
For a Halloween party, pair them with pumpkin-shaped cheese slices, orange bell peppers, and a bowl of black bean dip. You’ll have a colorful snack spread without spending your entire afternoon in the kitchen.
7. How Do I Store and Reheat Leftover Quesadillas?
Place leftover quesadillas in an airtight container and refrigerate them within two hours of cooking. Eat them within 3–4 days, and reheat them until the center reaches 165°F (74°C).
Use a skillet or air fryer to bring back some crispness. The microwave works too, but it can make the tortillas softer. FYI, the ghosts may lose a little of their crunch, but they’ll still taste delicious.
Final Thoughts
These Easy Halloween Ghost Quesadillas for Kids prove that Halloween food doesn’t need to be complicated to be memorable. With simple ingredients, adorable shapes, and gooey melted cheese, you can make a snack that feels festive without turning your kitchen into a haunted disaster zone.
Make them for a classroom party, a spooky movie night, or a fun family dinner before trick-or-treating. Let the kids decorate their own ghosts, experiment with silly expressions, and choose their favorite dipping sauces.
The best part? You can customize the filling, change the cheese, and use whatever toppings you already have in the fridge.
So grab those tortillas, melt that cheese, and create a little ghostly goodness. Your family gets a fun Halloween treat, and you get the satisfaction of making something adorable without spending hours on it.
Happy Halloween, and may your quesadillas stay cheesy and your little ghosts stay hungry.